Sunday, February 26, 2012

Two weekends... and a magic loop!

Last weekend was drizzly and overcast and my mood switched from patchwork to cosy knitting, and here is the result...
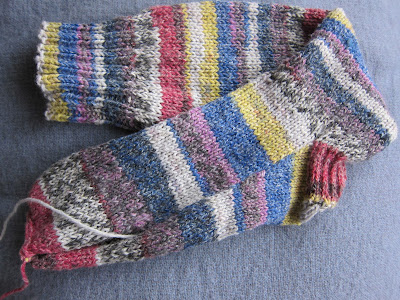
One sock. Very quick to knit in Crofter DK, done on two needles and seamed. Not quite finished as you can see. A very easy, mindless knit. Once, a long time ago, I knit a sock in the round using 4 ply yarn. One sock. And found the tedium unbearable, and discovered I hate knitting in the round on double pointed needles, and never finished the second sock. Juggling all those needles drove me mad.

Recently I found the most gorgeous fingerless mitt pattern on the web - and wouldn't you know it's knit in the round. But I bought the pdf anyway because I just loved the mitts, and mitts are smaller than socks, and I thought I might just manage.
This weekend the weather has been extreme for Hobart - in the high thirties - not good weather for sewing or using the iron! So I decided again to knit. And worked on the beautiful mitts (pictured above). The pattern recommends using the 'magic loop' method and it has CHANGED MY LIFE! Who would have thought knitting in the round could be so addictive? I have caught mitt mania and already have a few more magic loop mitt projects lined up. Using the recently purchased yarn below.
Do I need more yarn? No. Is it slightly odd to be thinking about winter mitts in thirty plus degree weather? Yes. But I have mitt mania...

Not glove mania, I will be clear about that. Gloves have fingers. And who wants to knit in tiny circles round and round ten tiny times? Not me. I'm very happy to knit gloves on two needles and seam each and every finger. I shall leave the round and roundness to fingerless mitts!

Tuesday, February 14, 2012

Happy Valentine's Day!

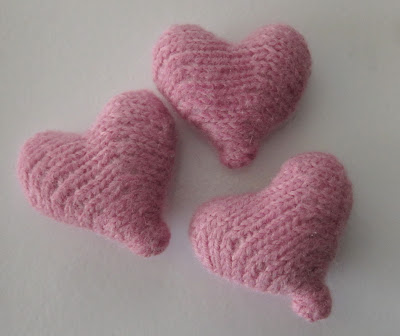
I made these felted hearts for my library colleagues, from a free Knitting Daily pattern.
They are such a clever design: using short row shaping to get the lovely shape. Mine didn't felt very well, though, and aren't as fuzzy and gorgeous as the ones pictured on the pattern.

Happy Valentine's Day everyone!

Monday, February 13, 2012

The blocks are done!

All 42 squares are ready to be sewn together. This will have to wait until next weekend. I'll need to tweak the block positions to get the balance just right.
I'm itching to buy fabric for the border, backing and binding, but the sensible thing to do will be to wait until the blocks are joined together. Then hopefully I'll get a better idea of which prints will work the best.

I do know I want a rich red for the border and backing, maybe the large scale print above for the back? I usually choose a cheap plain cotton for the back, but I'm going to splash out this time on fabrics from the same range. This quilt feels special and timeless to me, and I think it will be worth spending the extra money on more Rouenneries Deux to finish it 'properly'.

I'm also pondering a change to my blog banner. I'm thinking maybe squares of knitting, patchwork and embroidery in matching colours joined together, and with the words 'Yarn and Yearn' somehow worked into the pieces. I just love what other people have done with the look of their blogs. The banner really sums up the style of a blog, and at the moment I'm not sure mine says much at all. I really admire people who have a strong sense of their own style and express it in every detail. I suppose these are the people who inspire us to keep on creating - I know I'm never lost for ideas, and I thank all you wonderful crafters out there for keeping me inspired and motivated!

Sunday, February 12, 2012

Progress

A very short entry today - the Rouenneries Deux broken dishes blocks are multiplying...

Saturday, February 11, 2012

An ending and a beginning

A finished quilt for my dear friend Sara's birthday. The fabric was bought about a year ago after being inspired by this beautiful creation. Sara loves it and I'm so happy it's gone to a good home!
Here's a view of the back. The finished size is about 160 X 190 cm, and I squared off each block to 13 inches. Here's a good tutorial if you want to have a go at making some cross blocks yourself. You can vary the width and placement of the cross bars and the whole process becomes semi-improvised. The only thing I was fussy about was keeping the horizontal and vertical lines at 90 degrees because I like right angles!
I sandwiched the quilt on my bed - the only space large enough in my little flat. I used cotton flannel in the middle - mainly to minimise the bulk of the quilt to make quilting it easier. Another advantage of the flannel was that the front and back 'stuck' to it very nicely. It was easy to smooth out the creases and flip the quilt over without the whole sandwich falling apart. I used one pin per square and quilted in the ditch around each block. The quilting process was surprisingly quick and only took an afternoon. I bound the quilt in red and hand finished it. I really enjoyed making this quilt and have a vision of another one in pale acid pink and yellow and white. However.... I have lots of fabric to keep me occupied before I go out and buy more! Fabric like this:
Rouenneries Deux. I was so excited to hear French General were reworking this line that I bought four charm packs as soon as they were released. It's a long weekend this weekend and I'm going to make a good start on a quilt. The photo above shows two of the charm packs disassembled and squares of the same print paired together.
Next step was to sort the squares into pairs of reds and neutrals ready for my broken dishes blocks.
 Production line.
A finished broken dishes block. I just love French General fabric and am loving seeing these blocks come together.
Ten blocks so far - not bad for an afternoon's work. I'll end up with around 40 blocks altogether from the four charm packs. Each block will have a finished size of 8 inches - around 20cm. So with some chunky borders I'll end up with a good double sized quilt.

This morning after my yoga class I registered for the April Mariner's Compass paper piecing workshop at The Patch Works in West Hobart. I'm really looking forward to this. It looks like there'll be a lot of precision work required - and some curved seams! A lovely challenge. I've never done a quilting workshop before - I've taught myself from books and online tutorials - and am looking forward to being together with other creative people. I'll let you know how it goes!

Friday, February 10, 2012

Meet Arnold the penguin and Quick Red Fox

This is Arnold the penguin from Fiona Dalton's gorgeous book 'Hop Skip Jump'. I handed over my toy books to my sister and nephew and asked them to choose a toy each. My sister bookmarked a few patterns and my oldest nephew Marcel chose Arnold for her - good choice! I'm a big Hop Skip Jump fan and have made a few toys now. I really recommend purchasing the book - it's choc-full of really wonderful characters.
Arnold's beak is curved and a bit wonky, but I just think that adds to his character - I love it actually! The pattern called for a hat recycled from a jumper cuff. I didn't have one handy so knitted his beanie instead - from some Jo Sharp tweed - classy penguin! I filled his legs with rice instead of fibre-fill and they dangle sooooo cutely over the edge of the table. The rice gives his legs some weight and they swing very nicely when you give him a shake.
And finally, Marcel chose Quick Red Fox - such a standout pattern. Both nephews now have foxes! The only thing I did differently this time was to make the kerchief longer so I could tie it in a proper knot - the other one was a touch too short.

There will be more Hop Skip Jump toys to come, I'm sure. I already have another Arnold in mind for a young friend who likes penguins, and a doll all cut out and ready to sew.

Thursday, February 9, 2012

My very first pojagi!

It was my sister's birthday in January and I made her a pojagi window hanging as part of her birthday present. I used the same hanky linen as my bathroom curtain. I think the crisp texture and see-through-ness of the fabric is perfect for this technique. It's based on traditional Korean patchwork and I followed the Silly BooDilly's tutorial 2 here.
Here is the piece in progress. It was very enjoyable to make, but quite time consuming. You press and encase all the seams as you go to get the lovely stained glass outline effect. Here is a beautiful example in blues by the Silly BooDilly. Isn't that just one of the loveliest things? And another beautiful example in neutrals.
If you doubled your fabric in one of the panels you could encase a leaf, or a feather. So delicate and peaceful to look at.

Tuesday, February 7, 2012

A bag and a glove

It was my cousin's birthday in January and I made her a patchwork shopping tote. I used up all my eighths of some Heather Bailey Freshcut that I bought a few years ago. They were just waiting for the right project! I also added in the bright yellow and the brown print - I think they really make the other pieces zing. The bag is lined in patched pieces of Freshcut and is reversible.
The glove is the second half of my dear friend Izabel's birthday present. She received one glove for her birthday last year and I didn't manage to finish the other one until my summer holidays! Apologies Izabel! But I hope you enjoy your gloves when the weather cools and you have fun with the book. The glove is from a lovely Patons vintage book and has bobbles around the cuff and a little lace detail on the back. It is knitted in a 5 ply possum merino from New Zealand.
Both presents were packaged thus. In sheet music from 'The Mikado' sewn into an envelope.
Here is my finished cupboard and painted kitchen and tidy house! The remaining green wall will be covered with off white tiles to become a splash-back for the stove. I cooked dinner for friends recently and it was so nice not to have to spend half an hour moving things off the table and couch to make room for guests!
This is a view of the shelves on the kitchen side (behind that upper right blank panel that you can see in the previous photo). I had so much fun rearranging kitchen stuff and putting my nicest crockery on display. This is my little minimal designer zone and it makes me calm to look at it.

I have some more stuff to show you in my next few posts including some more Hop Skip Jump toys and a finished quilt! I hope you come back and take a look!